

[Spring] 스프링 MVC 2편 - 백엔드 웹 개발 활용 기술 섹션11 파일 업로드
◼️ 파일 업로드 소개
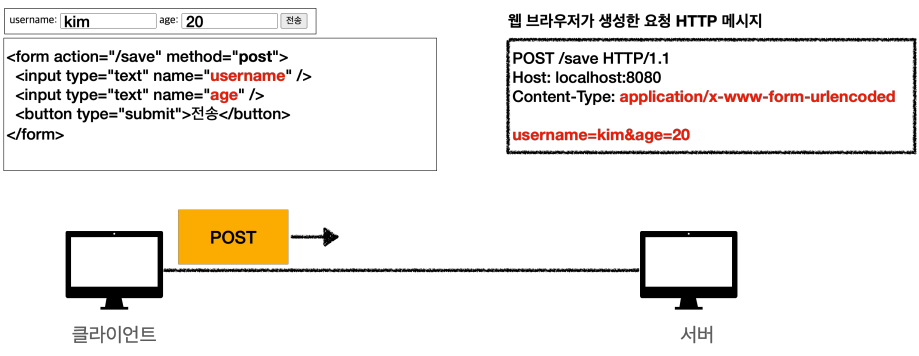
🟢 HTTP 폼 전송 방식
- application/x-www-form-urlencoded
- multipart/form-data

멀티파트 관련 처리는 default가 true지만, 관련 처리를 하지 않게 설정할 수 있다.
spring.servlet.multipart.enabled=true
🪄 참고
위 옵션을 켜면 MultipartResolver가 실행된다. 이것은 멀티파트 요청의 경우 서블릿 컨테이너가 전달하는 일반적인 HttpServletRequest 를 자식인터페이스인 MultipartHttpServletRequest 로 변환해서 반환한다.이는 멀티파트와 관련 된 추가 기능을 제공한다.
파일 업로드 사이즈를 제한 할 수 있다.
spring.servlet.multipart.max-file-size=1MB
spring.servlet.multipart.max-request-size=10MB◼️ 서블릿과 파일 업로드
실제 파일을 특정 경로에 업로드해보자. application.properties 에 저장할 파일 경로를 추가한다.
file.dir=C:/Users/USER/Desktop/file/@Slf4j
@Controller
@RequestMapping("/servlet/v2")
public class ServletUploadControllerV2 {
@Value("${file.dir}")
private String fileDir;
@GetMapping("/upload")
public String newFile() {
return "upload-form";
}
@PostMapping("/upload")
public String saveFileV1(HttpServletRequest request) throws
ServletException, IOException {
log.info("request={}",request);
String itemName = request.getParameter("itemName");
log.info("itemName={}",itemName);
Collection<Part> parts = request.getParts();
log.info("parts={}",parts);
for (Part part : parts) {
log.info("==== PART ====");
log.info("name={}", part.getName());
Collection<String> headerNames = part.getHeaderNames();
for (String headerName : headerNames) {
// content-disposition; filename
log.info("header {}: {}",headerName,part.getHeader(headerName));
}
// 편의 메서드
log.info("submittedFilename={}",part.getSubmittedFileName());
log.info("size={}",part.getSize());
// 데이터 읽기
InputStream inputStream = part.getInputStream(); // Part 의 전송 데이터 읽기
String body = StreamUtils.copyToString(inputStream, StandardCharsets.UTF_8);
log.info("body={}",body);
//파일에 저장하기
// getSubmittedFileName; 클라이언트가 전달한 파일명
if (StringUtils.hasText(part.getSubmittedFileName())){
String fullPath = fileDir + part.getSubmittedFileName();
log.info("파일 저장 fullPath={}",fullPath);
part.write(fullPath); // Part 를 통해 전송된 데이터를 저장
}
}
return "upload-form";
}
}==== PART ====
name=itemName
header content-disposition: form-data; name="itemName"
submittedFileName=null
size=7
body=상품A
==== PART ====
name=file
header content-disposition: form-data; name="file"; filename="스크린샷.png"
header content-type: image/png
submittedFileName=스크린샷.png
size=112384
body=qwlkjek2ljlese...
파일 저장 fullPath=/Users/kimyounghan/study/file/스크린샷.png
🪄 참고
큰 용량의 파일을 업로드를 테스트 할 때는 로그가 너무 많이 남아서 다음 옵션을 끄는 것이 좋다. logging.level.org.apache.coyote.http11=trace
다음 부분도 파일의 바이너리 데이터를 모두 출력하므로 끄는 것이 좋다.
log.info("body={}", body);
◼️ 스프링과 파일 업로드
스프링은 MultipartFile 이라는 인터페이스로 멀티파트 파일을 매우 편리하게 지원한다.
@PostMapping("/upload")
public String saveFileV3(@RequestParam String itemName, // @ModelAttribute에서도 MultipartFile사용가능
                         @RequestParam MultipartFile file, HttpServletRequest request) throws
        ServletException, IOException {
    log.info("request={}", request);
    log.info("itemName={}", itemName);
    log.info("multipartFile={}", file);

    if (!file.isEmpty()) {
        String fullPath = fileDir + file.getOriginalFilename(); //업로드 파일명
        log.info("파일 저장 fullPath={}", fullPath);
        file.transferTo(new File(fullPath)); // 파일저장
    }
    return "upload-form";
}request=org.springframework.web.multipart.support.StandardMultipartHttpServletRe quest@5c022dc6 itemName=상품A
multipartFile=org.springframework.web.multipart.support.StandardMultipartHttpSer vletRequest$StandardMultipartFile@274ba730
파일 저장 fullPath=/Users/kimyounghan/study/file/스크린샷.png
'Spring' 카테고리의 다른 글
| [Spring] 스프링 DB 1편 - 데이터 접근 핵심 원리 섹션2 커넥션풀과 데이터소스 이해 (0) | 2024.05.29 |
|---|---|
| [Spring] 스프링 DB 1편 - 데이터 접근 핵심 원리 섹션1 JDBC 이해 (0) | 2024.05.28 |
| [Spring] Spring Type Conversion 문서 정리 및 요약 (0) | 2024.05.18 |
| [Spring] 스프링 MVC 2편 - 백엔드 웹 개발 활용 기술 섹션10 스프링 타입 컨버터 (0) | 2024.05.18 |
| [Spring] 스프링 MVC 2편 - 백엔드 웹 개발 활용 기술 섹션9 API 예외 처리 (0) | 2024.05.14 |