

▪️스프링 시큐리티와 OAuth 2.0 으로 구글 로그인
- [사용자 인증정보] 클릭
- [사용자 인증 정보 만들기] → OAuth2 클라이언트 ID 클릭
- 동의 화면 구성 → API 범위 설정(email,profile,openid등...)->저장
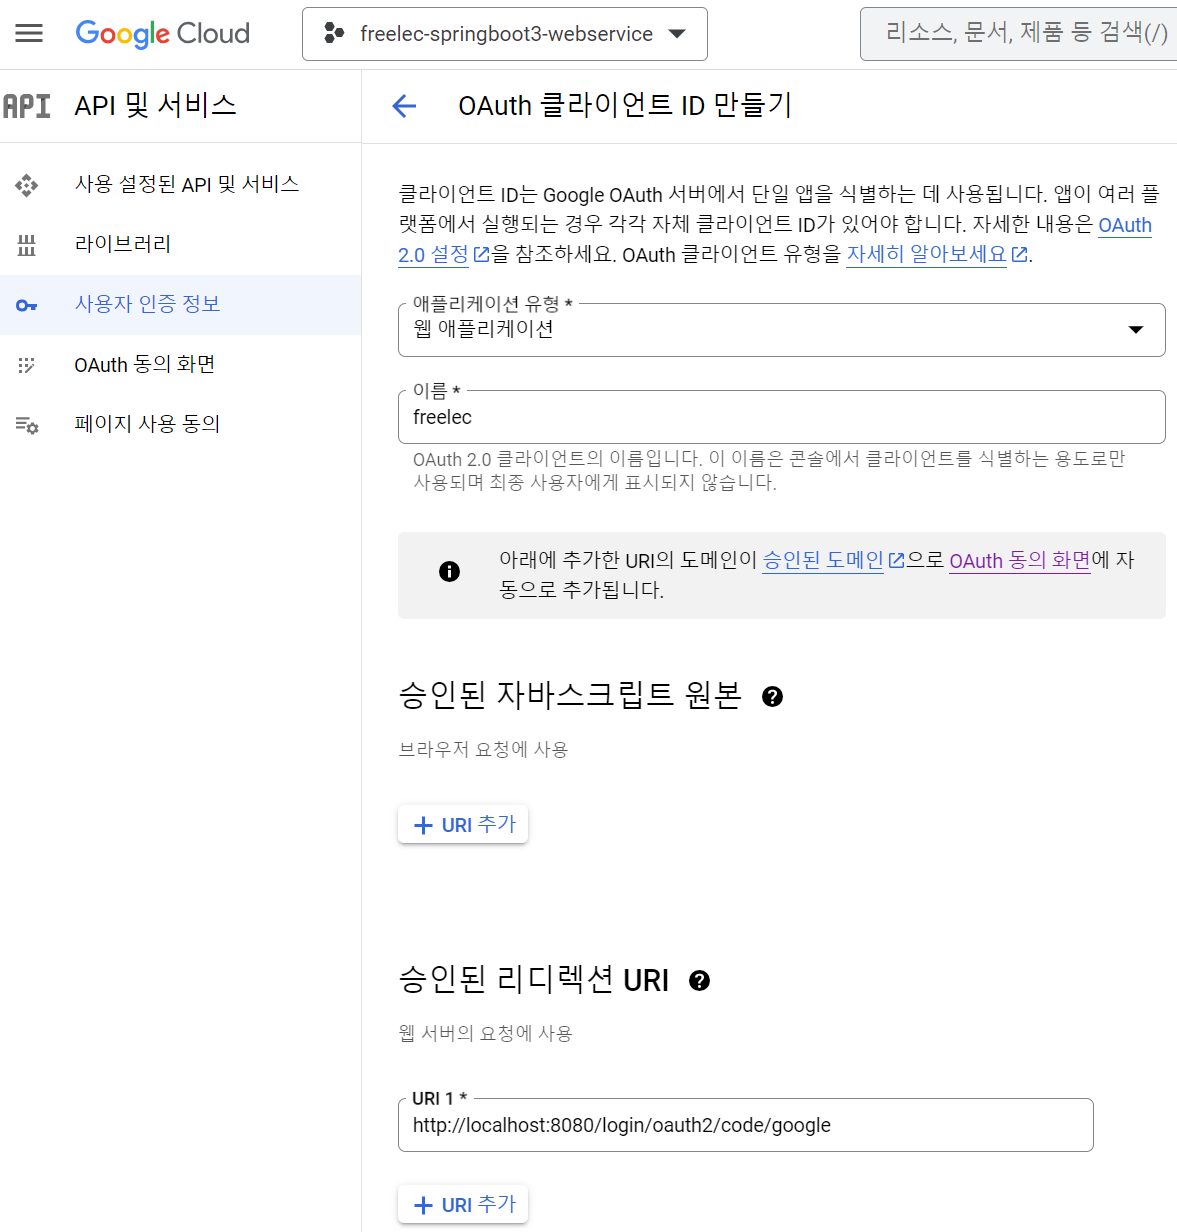
- OAuth 클라이언트 ID 만들기 화면 → 웹 애플리케이션
- → 승인된 리디렉션 URI 등록 ({도메인}/login/oauth2/code/google)
- src/main/resources/ 디렉토리에 application-oauth2.properties 파일 생성 후 아래 입력
spring.security.oauth2.client.registration.google.client-id=15775082482-moi3t2j4l8167hijdg5ne9k2l61la178.apps.googleusercontent.com spring.security.oauth2.client.registration.google.client-secret=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 spring.security.oauth2.client.registration.google.scope=profile,email - application.properties에서 application-oauth2.properties를 포함하도록 구성
spring: # oauth 설정 profiles: include: oauth - .gitignore에 oauth2 properties 파일 올라가지 않도록 설정
### oauth2.0 application-oauth.properties - + 추가로, 테스트를 위해 테스트 사용자이메일을 등록 해준다. (아니면 403 에러 뜸)
▪️구글 로그인 연동
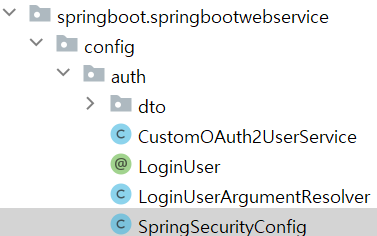
springboot.springbootwebservice.domain.user.class 생성
package springboot.springbootwebservice.domain.user;

import jakarta.persistence.*;
import lombok.Builder;
import lombok.Getter;
import lombok.NoArgsConstructor;
import springboot.springbootwebservice.domain.BaseTimeEntity;

@Getter
@NoArgsConstructor
@Table(name = "users")
@Entity
public class User extends BaseTimeEntity {

    @Id
    @GeneratedValue(strategy = GenerationType.IDENTITY)
    private Long id;

    @Column(nullable = false)
    private String name;

    @Column(nullable = false)
    private String email;

    @Column
    private String picture;

    // JPA로 데이터베이스로 지정할 때 Enum 값을 어떤 형태로 저장할지 결정.
    // 기본적으로는 int로 된 숫자가 저장. 숫자로 저장되면 데이터베이스로 확인할 때 그 값이 무슨 코드를 의미하는지 알 수가 없다.
    // 그래서 문자열(EnumType.STRING)로 저장될 수 있도록 선언
    @Enumerated(EnumType.STRING)
    @Column(nullable = false)
    private Role role;

    @Builder
    public User(String name, String email, String picture, Role role) {
        this.name = name;
        this.email = email;
        this.picture = picture;
        this.role = role;
    }

    public User update(String name, String picture) {
        this.name = name;
        this.picture = picture;

        return this;
    }

    public String getRoleKey() {
        return this.role.getKey();
    }
}springboot.springbootwebservice.domain.user 생성
- 권한 코드에는 항상 ROLE_ 이 앞에 있어야 한다.
package springboot.springbootwebservice.domain.user;

import lombok.Getter;
import lombok.RequiredArgsConstructor;

@Getter
@RequiredArgsConstructor
public enum Role {

    // spring security에서는 권한 코드에 항상 ROLE_이 앞에 있어야 한다.
    // 그래서 코드별 키 값을 ROLE_XXX 등으로 지정
    GUEST   ("ROLE_GUREST", "손님"),
    USER    ("ROLE_USER", "일반 사용자");

    private final String key;
    private final String title;
}
build.gradle에 스프링 시큐리티 의존성 추가
// security
implementation 'org.springframework.boot:spring-boot-starter-security'
SpringSecurityConfig 클래스 생성
package springboot.springbootwebservice.config.auth;

import jakarta.servlet.DispatcherType;
import lombok.RequiredArgsConstructor;
import org.springframework.context.annotation.Bean;
import org.springframework.context.annotation.Configuration;
import org.springframework.security.config.Customizer;
import org.springframework.security.config.annotation.web.builders.HttpSecurity;
import org.springframework.security.config.annotation.web.configuration.EnableWebSecurity;
import org.springframework.security.web.SecurityFilterChain;
import org.springframework.security.web.header.writers.frameoptions.XFrameOptionsHeaderWriter;
import org.springframework.security.web.util.matcher.AntPathRequestMatcher;
import springboot.springbootwebservice.domain.user.Role;

@RequiredArgsConstructor
@EnableWebSecurity  // Spring Security를 활성화
@Configuration
public class SpringSecurityConfig {

    private final CustomOAuth2UserService customOAuth2UserService;

    // spring security 적용 하지 않을 URL 리스트
    private static final String[] AUTH_WHITELIST = {
            "/",
            "/css/**",
            "/image/**",
            "/js/**",
            "/h2-console/**"
    };
    // 인증 필요 리스트
    private static final String[] VERIFICATION_AUTH_LIST = {
            "/api/v1/**"
    };

    @Bean
    protected SecurityFilterChain config(HttpSecurity http) throws Exception {
        http
                .csrf().disable()
                .headers().frameOptions().disable() // h2-console 화면을 사용하기 위해 해당 옵션들을 disable 처리
                .and()
                .authorizeHttpRequests( // antMatchers(), mvcMatchers(), regexMatchers()가 -> authorizeHttpRequests() 또는 securityMatchers()로 변경
                        request -> request
                                .dispatcherTypeMatchers(DispatcherType.FORWARD).permitAll()
                                .requestMatchers(AUTH_WHITELIST).permitAll()
//                                .requestMatchers("/", "/css/**", "/image/**", "/js/**", "/h2-console/**").permitAll()
                                .requestMatchers(VERIFICATION_AUTH_LIST).hasRole(Role.USER.name())    // 권한 관리 대상을 지정하는 옵션, URL, HTTP 메서드별로 관리가 가능, "/" 등 지정된 URL들을 permitAll() 옵션을 통해 전체 열람 권한을 줌, "/api/v1/**"주소를 가진 API는 USER 권한을 가진 사람만 가능
                                .anyRequest().authenticated()   // 설정된 값들 이외 나머지 URL들을 나타낸다. 여기선 authenticated()을 추가하여 나머지 URL들은 모두 인증된 사용자들에게만 허용. 즉, 인증된 사용자, 로그인한 사용자들만 허용
                )
                .logout().logoutSuccessUrl("/")
                .and()
                .oauth2Login()  // OAuth2.0 로그인 기능에 대한 여러 설정의 진입점
                    .userInfoEndpoint() // OAuth2.0 로그인 성공 이후 사용자 정보를 가져올 때의 설정들을 담당
                    .userService(customOAuth2UserService);  // 소셜 로그인 성공 시 후속 조치를 진행할 UserService 인터페이스의 구현체를 등록. 리소스 서버(즉, 소설 서비스)에서 사용자 정보를 가져온 상태에서 추가로 진행하고자 하는 기능을 명시
        return http.build();
    }
}
CustomOAuth2UserService 클래스 생성
package springboot.springbootwebservice.config.auth;

import jakarta.servlet.http.HttpSession;
import lombok.RequiredArgsConstructor;
import org.springframework.security.core.authority.SimpleGrantedAuthority;
import org.springframework.security.oauth2.client.userinfo.DefaultOAuth2UserService;
import org.springframework.security.oauth2.client.userinfo.OAuth2UserRequest;
import org.springframework.security.oauth2.client.userinfo.OAuth2UserService;
import org.springframework.security.oauth2.core.OAuth2AuthenticationException;
import org.springframework.security.oauth2.core.user.DefaultOAuth2User;
import org.springframework.security.oauth2.core.user.OAuth2User;
import org.springframework.stereotype.Service;
import springboot.springbootwebservice.config.auth.dto.OAuthAttributes;
import springboot.springbootwebservice.config.auth.dto.SessionUser;
import springboot.springbootwebservice.domain.user.User;
import springboot.springbootwebservice.domain.user.UserRepository;

import java.util.Collections;

@RequiredArgsConstructor
@Service
public class CustomOAuth2UserService implements OAuth2UserService<OAuth2UserRequest, OAuth2User> {

    private final UserRepository userRepository;
    private final HttpSession httpSession;

    @Override
    public OAuth2User loadUser(OAuth2UserRequest userRequest) throws OAuth2AuthenticationException {
        OAuth2UserService<OAuth2UserRequest, OAuth2User> delegate = new DefaultOAuth2UserService();
        OAuth2User oAuth2User = delegate.loadUser(userRequest);

        // RegistrationId()
        // 현재 로그인 진행 중인 서비스를 구분하는 코드
        // 현재 구글만 사용하는 불필요한 값이지만, 이후 네이버 로그인 연동시에 네이버 로그인 인지, 구글 로그인인지 구분하기 위함
        String registrationId = userRequest.getClientRegistration().getRegistrationId();

        // UserNameAttributeName()
        // OAuth2 로그인 진행 시 키가 되는 필드값을 이야기 한다. Primary Key와 같은 의미.
        // 구글의 경우 기본적으로 코드를 지원하지만, 네이버 카카 등은 기본 지원하지 않는다. 구굴의 기본 코드는 "sub"
        // 이후 네이버 로그인과 구글 로그인을 동시에 지원할 때 사용
        String userNameAttributeName = userRequest.getClientRegistration().getProviderDetails().getUserInfoEndpoint().getUserNameAttributeName();

        // OAuthAttributes
        // OAuth2UserService를 통해 가져온 OAuth2User의 attribute를 담은 클래스.
        // 이후 네이버 등 다른 소셜 로그인도 이 클래스를 사용
        OAuthAttributes authAttributes = OAuthAttributes.of(registrationId, userNameAttributeName, oAuth2User.getAttributes());

        User user = saveOrUpdate(authAttributes);

        // SessionUser
        // 세션에 사용자 정보를 저장하니 위한 DTO 클래스
        // 왜 User 클래스를 쓰지 않고 새로 만들어서 쓰는지?
        // -> 만약 User 클래스를 그대로 사용했으면 다음과 같은 에러가 발생한다.
        // Failed to convert from type [java.lang.Object]
        // 이는 세션에 저장하기 위해 User 클래스를 세션에 저장하려고 하니, User 클래스에 직렬화를 구현하지 않았다.는 의미의 에러이다.
        httpSession.setAttribute("user", new SessionUser(user));
//        httpSession.setAttribute("user", user);

        return new DefaultOAuth2User(
                Collections.singleton(new SimpleGrantedAuthority(user.getRoleKey())),
                authAttributes.getAttributes(),
                authAttributes.getNameAttributeKey());

    }

    private User saveOrUpdate(OAuthAttributes attributes) {
        User user = userRepository.findByEmail(attributes.getEmail())
                .map(entity -> entity.update(attributes.getName(), attributes.getPicture()))
                .orElse(attributes.toEntity());

        return userRepository.save(user);
    }
}
config.auth.dto 패키지에 OAuthAttributes 클래스 생성
package springboot.springbootwebservice.config.auth.dto;

import lombok.Builder;
import lombok.Getter;
import springboot.springbootwebservice.domain.user.Role;
import springboot.springbootwebservice.domain.user.User;

import java.util.Map;

@Getter
public class OAuthAttributes {
    private Map<String, Object> attributes;
    private String nameAttributeKey;
    private String name;
    private String email;
    private String picture;

    @Builder
    public OAuthAttributes(Map<String, Object> attributes, String nameAttributeKey, String name, String email, String picture) {
        this.attributes = attributes;
        this.nameAttributeKey = nameAttributeKey;
        this.name = name;
        this.email = email;
        this.picture = picture;
    }

    // OAuth2User에서 반환하는 사용자 정보는 Map이기 때문에 값 하나하나를 변환해야 한다.
    public static OAuthAttributes of(String registrationId, String userNAmeAttributeName, Map<String, Object> attributes) {
        if ("naver".equals(registrationId)) return ofNaver("id", attributes);
        return ofGoogle(userNAmeAttributeName, attributes);
    }

    // google login OAuth
    private static OAuthAttributes ofGoogle(String userNameAttributeName, Map<String, Object> attributes) {
        return OAuthAttributes.builder()
                .name((String) attributes.get("name"))
                .email((String) attributes.get("email"))
                .picture((String) attributes.get("picture"))
                .attributes(attributes)
                .nameAttributeKey(userNameAttributeName)
                .build();
    }

    // naver login OAuth
    private static OAuthAttributes ofNaver(String userNameAttributeName, Map<String, Object> attributes) {
        Map<String, Object> response = (Map<String, Object>) attributes.get("response");
        return OAuthAttributes.builder()
                .name((String) response.get("name"))
                .email((String) response.get("email"))
                .picture((String) response.get("profile_image"))
                .attributes(response)
                .nameAttributeKey(userNameAttributeName)
                .build();
    }

    // User 엔티티를 생성 후 OAuthAttributes에서 엔티티를 생성하는 시점은 처음 가입할 때이다.
    // 가입할 때의 기본 권한은 GUEST로 주기 위해서 role 빌더값에는 Role.GUEST를 사용한다.
    // OAuthAttributes 클래스 생성이 끝났으면 같은 패키지에 SessionUser 클래스를 생성
    public User toEntity() {
        return User.builder()
                .name(name)
                .email(email)
                .picture(picture)
                .role(Role.GUEST)
                .build();
    }
}config.auth.dto 패키지에 SessionUser 클래스 추가
- SessionUser에는 인증된 사용자 정보만 필요하다.
package springboot.springbootwebservice.config.auth.dto;

import lombok.Getter;
import springboot.springbootwebservice.domain.user.User;

import java.io.Serializable;

@Getter
public class SessionUser implements Serializable {
    private String name;
    private String email;
    private String picture;

    public SessionUser(User user) {
        this.name = user.getName();
        this.email = user.getEmail();
        this.picture = user.getPicture();
    }
}
여기서 세션에 저장하기 위해 SessionUser 대신 User 클래스를 사용하면 안되는 것일까?
User 클래스는 엔티티이다. 엔티티 클래스에서는 언제 다른 엔티티와의 관계가 형성될지 모른다.
@ManyToMany, @OneToMany 등 자식 엔티티를 갖고 있어 직렬화 대상에 자식들까지 포함되어 성능 이슈,부수 효과가 발생할 확률이 높다.
따라서 직렬화 기능을 가진 세션 Dto를 하나 추가로 만드는 것이 이후 운영 및 유지보수할때 도움이 된다.
스프링 시큐리티 기본 제공 로그인 URL (/oauth2/authorization/google)을 a href=에 넣어 로그인 코드 추가
index.html 로그인 부
<h1>스프링부트로 시작하는 웹 서비스</h1>
<div class="col-md-12">
    <button type="button" class="btn btn-primary" data-toggle="modal" data-target="#savePostsModal">글 등록</button>
    <div th:unless="${userName}">
        <!--
            - 네이버 로그인 URL은 appication-oauth.yml에 등록한 redirect-uri 값에 맞춰 자동으로 등록된다.
            - /oauth2/authorization/ 까지는 고정이고 마지막 Path만 각 소셜 로그인 코드를 사용하면 된다.
            - 여기서는 naver가 마지막 Path가 된다.
        -->
        <a th:href="@{/oauth2/authorization/google}" class="btn btn-success active" role="button">Google Login</a>
        <a th:href="@{/oauth2/authorization/naver}" class="btn btn-secondary active" role="button">Naver Login</a>
    </div>
    <div th:if="${userName}">
        Logged in as : <span id="user" th:text="${userName}"></span>
        <a th:href="@{/logout}" class="btn btn-info active" role="button">Logout</a>
    </div>
    <br/>
    <br/>
로그인 컨트롤러 코드
@GetMapping("/")
public String index(Model model, @LoginUser SessionUser user) {
model.addAttribute("posts", postsService.findAllDesc());
SessionUser user = (User) httpSession.getAttribute("user");
if (user != null) model.addAttribute("userName", user.getName());
return "index";
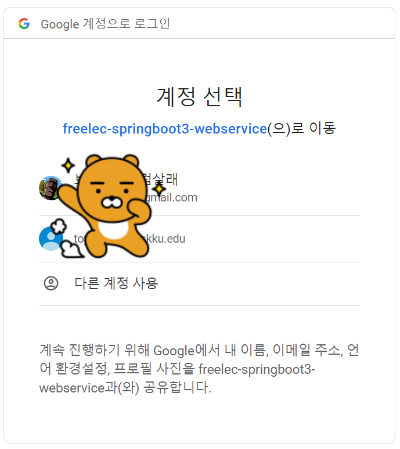
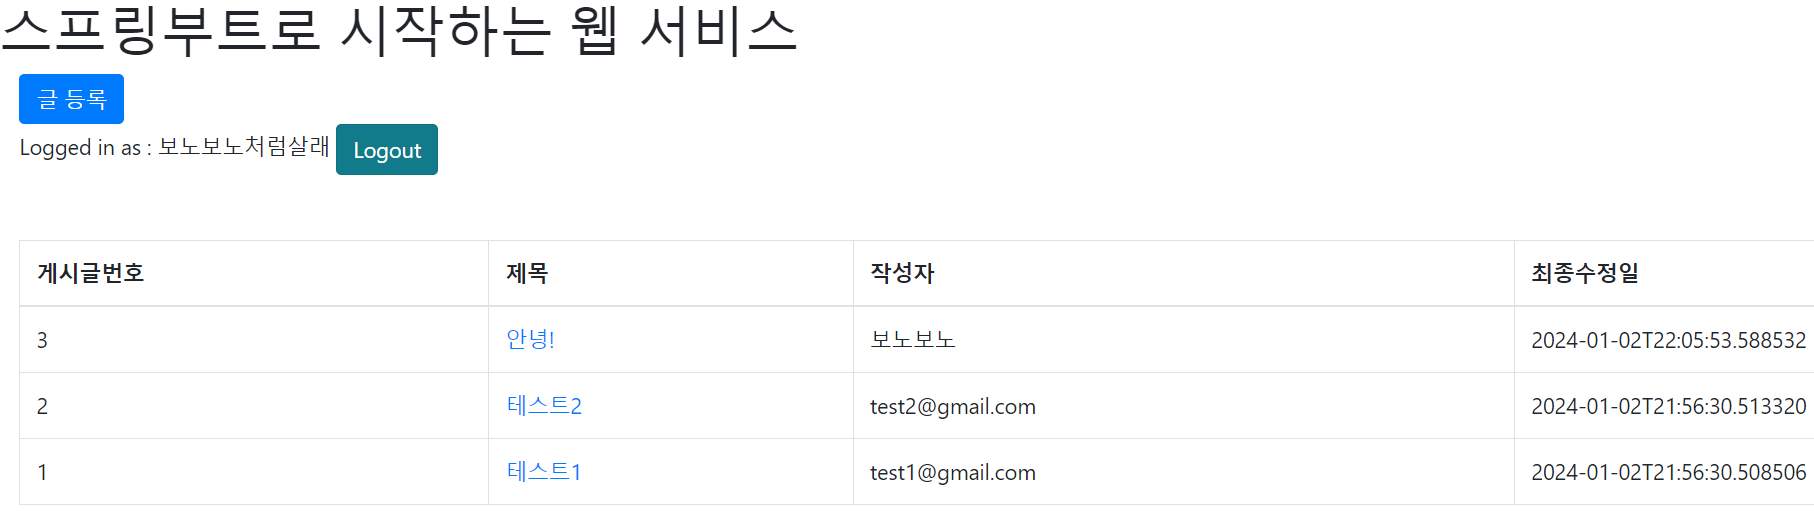
}로그인이 잘 된다!
▪️어노테이션 기반으로 개선하기
INDEX가 다음과 같다면, 세션값을 가져오는 부분에서 다른 컨트롤러,메소드마다 직접 세션에서 값을 가져와야 한다.
같은 코드가 계속해서 반복되는 것은 불필요하다.따라서 이 부분을 메소드 인자로 세션값을 바로 받을 수 있도록 변경해야 한다.
@GetMapping("/")
public String index(Model model, SessionUser user) {
    model.addAttribute("posts", postsService.findAllDesc());
    SessionUser user = (User) httpSession.getAttribute("user"); // 이부분!
    if (user != null) model.addAttribute("userName", user.getName());
    return "index";
}config.auth 패키지에 아래와 같이 @LoginUser 어노테이션을 생성한다.
package springboot.springbootwebservice.config.auth;

import java.lang.annotation.ElementType;
import java.lang.annotation.Retention;
import java.lang.annotation.RetentionPolicy;
import java.lang.annotation.Target;

@Target(ElementType.PARAMETER)  // 이 어노테이션이 생성될 수 있는 위치를 지정. PARAMETER로 지정했으니 메서드의 파라미터로 선언도니 객체에서만 사용할 수 있다. 이외에도 클래스 선언문에 쓸 수 있는 TYPE 등이 있다.
@Retention(RetentionPolicy.RUNTIME)
public @interface LoginUser {// @interface; 이 파일을 어노테이션 클래스로 지정. LoginUser 라는 이름을 가진 어노테이션이 생성되었다고 보면 된다.
}이어서, 같은 위치에 LoginUserArgumentResolver를 생성한다. LoginUserArgumentResolver는 HandlerMethodArgumentResolver 인터페이스를 구현한 클래스이다. 이 클래스는 조건에 맞는 경우 메소드가 있다면 구현체가 지정한 값으로 해당 메소드의 파라미터로 넘길 수 있다.
package springboot.springbootwebservice.config.auth;

import jakarta.servlet.http.HttpSession;
import lombok.RequiredArgsConstructor;
import org.springframework.core.MethodParameter;
import org.springframework.stereotype.Component;
import org.springframework.web.bind.support.WebDataBinderFactory;
import org.springframework.web.context.request.NativeWebRequest;
import org.springframework.web.method.support.HandlerMethodArgumentResolver;
import org.springframework.web.method.support.ModelAndViewContainer;
import springboot.springbootwebservice.config.auth.dto.SessionUser;

@RequiredArgsConstructor
@Component
public class LoginUserArgumentResolver implements HandlerMethodArgumentResolver {

    private final HttpSession httpSession;

    // Contoller 메서드의 특정 파라미터를 지원하는지 판단.
    // 여기서는 파라미터에 @LoginUser 어노테이션이 붙어 있고, 파라미터 클래스 타임이 SessionUser.class인 경우 true를 반환.
    @Override
    public boolean supportsParameter(MethodParameter parameter) {
        boolean isLoginUserAnnotation = parameter.getParameterAnnotations() != null;
        boolean isUserClass = SessionUser.class.equals(parameter.getParameterType());
        return isLoginUserAnnotation && isUserClass;
    }

    // 파라미터에 전달할 객체를 생성
    // 여기서는 세션에서 객체를 가져옵니다.
    @Override
    public Object resolveArgument(MethodParameter parameter,
                                  ModelAndViewContainer mavContainer,
                                  NativeWebRequest webRequest,
                                  WebDataBinderFactory binderFactory) throws Exception {
        return httpSession.getAttribute("user");
    }
}이어서 이렇게 새성된 LoginUserArgumentResolver가 스프링에서 인식될 수 있도록 WebMvcConfigurer에 추가한다. config 패키지에 WebConfig 클래스를 생성하여 다음과 같이 설정을 추가한다.
package springboot.springbootwebservice.config;

import lombok.RequiredArgsConstructor;
import org.springframework.context.annotation.Configuration;
import org.springframework.web.method.support.HandlerMethodArgumentResolver;
import org.springframework.web.servlet.config.annotation.WebMvcConfigurer;
import springboot.springbootwebservice.config.auth.LoginUserArgumentResolver;

import java.util.List;

@RequiredArgsConstructor
@Configuration
public class WebConfig implements WebMvcConfigurer {
    private final LoginUserArgumentResolver loginUserArgumentResolver;

    @Override
    public void addArgumentResolvers(List<HandlerMethodArgumentResolver> argumentResolvers) {
        argumentResolvers.add(loginUserArgumentResolver);
    }
}모든 설정이 끝났으니 반복되는 부분을 @LoginUser로 개선한다.
    // Model : 서버 템플릿 엔진에서 사용할 수 있는 객체를 저장할 수 있다. postsService.findAllDesc()에서 가져온 결과를 "posts"로 index.html에 전달.
    // @LoginUser SessionUser user : 기존 (User) httpSession.getAttribute("user")로 가져오던 세션 정보 값이 개선. 이제 어느 Contoller든지 @LoginUser만 사용하면 세션 정보를 가져올 수 있게 된다.
    @GetMapping("/")
    public String index(Model model, @LoginUser SessionUser user) {
        model.addAttribute("posts", postsService.findAllDesc());
        if (user != null) model.addAttribute("userName", user.getName());
        return "index";
}▪️세션 저장소로 데이터베이스 사용하기
1. 문제점
현재 스프링부트로 서버를 구동하고 있다. 추가적으로 OAuth2를 이용하여 소셜로그인 기능이 정상적으로 진행되는 상황이다. 그런데 소셜로그인 이후 어플리케이션을 재실행 하면 로그인이 풀린다. 이유는 기본적으로 세션이 실행되는 WAS의 메모리에서 저장되고 호출되기 때문이다. 따라서 스프링부트와 같은 내장 Tomcat(WAS)를 사용하는 구조에서는 어플리케이션 재실행시에 WAS또한 재실행 됨으로 항상 WAS의 메모리 또한 초기화 되기에 세션이 유지되지 못하는 것이었다. 즉, 스프링부트에서는 배포할 때마다 톰캣이 재시작 되는 것이다.
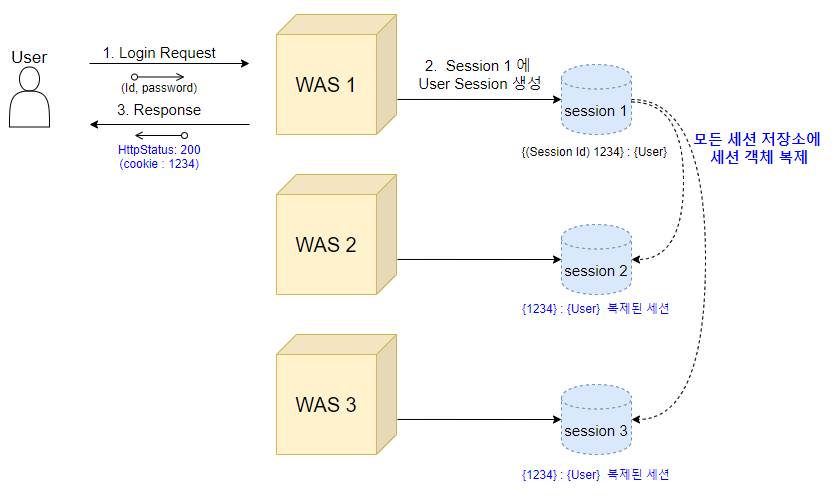
추가적으로 2대 이상의 서버에서 서비스하고 있는 경우에는 톰캣마다 세션 동기화 설정을 해야만한다고 한다.위 그림이 그 예시이다.
실제 현업에서는 세션 저장소에 대해 다음의 3가지 중 한가지를 선택한다.
1) 톰캣 세션을 사용
일반적으로 별다른 설정을 하지 않았을 때 기본적으로 선택되는 방식
이렇게 될 경우 위 그림과 같이 WAS에 세션이 저장되기 때문에 2대이상의 WAS가 구동되는 환경에서는 톰캣들 간의 세션 공유를 위한 추가설정이 필요하다.
모든 서버가 동일한 세션 객체를 가져야하기 때문에 많은 메모리가 필요하다.
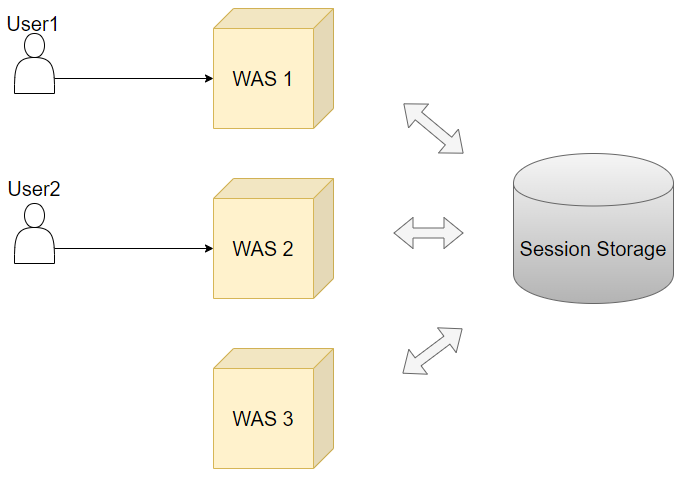
2) MySQL,Oracle과 같은 데이터베이스를 세션 저장소로 사용한다.
여러 WAS간 공용세션을 사용할 수 있는 가장 쉬운 방법
많은 설정이 필요 없지만, 로그인 할 때마다 DB I/O가 발생하여 성능상 이슈가 발생할 수 있다.
보통 로그인 요청이 많이 없는 백오피스, 사내 시스템 용도에서 사용한다.
3) Redis, Memcached와 같은 인메모리DB를 세션저장소로 이용
B2C 서비스에서 가장 많이 이용하는 방식
실제 서비스로 사용하기 위해서는 Embedded Redis와 같은 방식이 아닌 외부 메모리 서버가 필요하다.
이와 같은 서비스는 별도의 사용료를 지불하는 경우가 많다.
아래 그림이 Redis의 구조이다
실제 상용화 되는 서비스가 아니기 때문에 두번째 방식인 데이터베이스를 세션 저장소로 사용하는 방식을 사용한다. 그 이유는, 간단하고 사용자가 많지 않아 로그인이 잦지 않으며, 방법3은 비용적으로도 부담스럽기 때문이다. 추후 실제 서비스화가 된다면 Redis와 같은 메모리 DB도 고려해보는 것이 좋다.
스프링부트 추가 설정 진행과정을 다음과 같다.
1) build.gradle에 다음과 같은 의존성
complie('org.springframework.session:spring-session-jdbc')
2) application.properties에 세션 저장소를 jdbc로 선택하도록 설정
spring.session.store-type=jdbc
이렇게 하면, JPA로 인해 세션테이블이 자동 생성된다.위와 같이 한뒤 h2-console에 접속하면 세션을 위한 테이블 2개(SPRING_SESSION,SPRING_SESSION_ATTRIBUTES)가 생성된 것을 볼 수 있다. JPA로 인해 세션 테이블이 자동 생성되었기 때문에, 별도로 해야할 일은 없다.
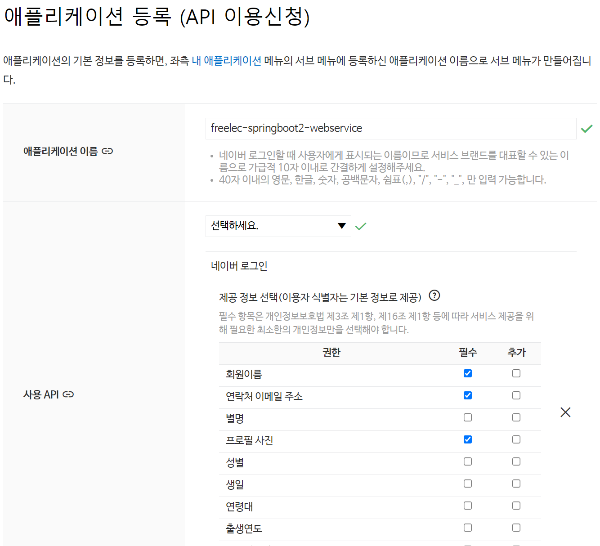
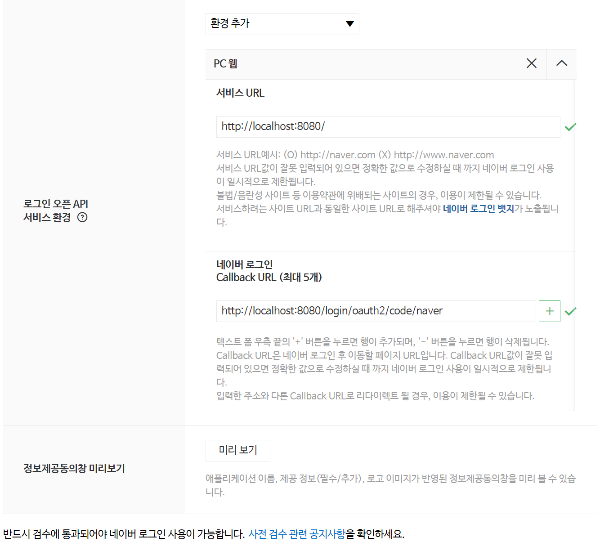
▪️네이버 로그인
네이버 오픈 API로 이동 후 각 항목을 채운다. Callback URL은 구글에서 등록한 리디렉션 URL과 같은 역할을 한다.
그 후 application-oauth.properties에 코드를 추가한다. application-oauth.properties 파일에 있는 설정은 Spring Boot에서 OAuth 2.0 인증 프로토콜을 이용하여 네이버 로그인을 구현하는데 필요한 정보들을 설정하는 부분이다.
네이버는 Spring Security에서 공식 지원하지 않아서 Common-OAuth2Provider를 통해 정보를 제공받지 못하여 일일이 수동으로 입력해줘야 한다.
#naver-registration
spring.security.oauth2.client.registration.naver.client-id=//
spring.security.oauth2.client.registration.naver.client-secret=//
spring.security.oauth2.client.registration.naver.redirect-uri={baseUrl}/{action}/oauth2/code/{registrationId}
spring.security.oauth2.client.registration.naver.authorization-grant-type=authorization_code
spring.security.oauth2.client.registration.naver.scope=name,email,profile_image
spring.security.oauth2.client.registration.naver.client-name=Naver

#naver-provider
spring.security.oauth2.client.provider.naver.authorization_uri=https://nid.naver.com/oauth2.0/authorize
spring.security.oauth2.client.provider.naver.token_uri=https://nid.naver.com/oauth2.0/token
spring.security.oauth2.client.provider.naver.user-info-uri=https://openapi.naver.com/v1/nid/me
spring.security.oauth2.client.provider.naver.user_name_attribute=response
마지막에 있는 user_name_attribute는 기준이 되는 user_name의 이름을 네이버에서는 response로 해야한다. 이유는 네이버 회원 조회 시 반환되는 JSON 형태 때문인데, 형태는 아래와 같다.
{
  	"resultcode" : "00",
  	"message" : "success",
  	"response" : {
    	"email" : "openapi@naver.com",
      	"nickname" : "OpenAPI",
     	"profile_image" : "https://ssl.pstatic.net/statice/pwe/address/nodate_33x33.gif",
        "age" : "40-49",
		"gender" : "F",
		"id" : "32742776",
		"name" : "오픈API",
      	"birthday" : "10-01",
    }
}Spring Security에선 하위 필드를 명시할 수 없다. 네이버 응답값 최상위 필드는 resultcode,message,response인데, Spring Security에선 세 개의 필드만 인식 가능하다.따라서 이중에서 골라야 한다.여기서는 자바 코드로 response의 id를 user_name으로 지정한다.
다음으로 Spring Security 설정 등록을 해준다. 구글 로그인에서 대부분 코드를 확장성 있게 작성했기 때문에,OAuthAttributes에 다음과 같이 네이버인지 판단하는 코드와 네이버 생성자만 추가해 주면 된다.
// OAuth2User에서 반환하는 사용자 정보는 Map이기 때문에 값 하나하나를 변환해야 한다.
public static OAuthAttributes of(String registrationId, String userNAmeAttributeName, Map<String, Object> attributes) {
    if ("naver".equals(registrationId)) return ofNaver("id", attributes);
    return ofGoogle(userNAmeAttributeName, attributes);
}// naver login OAuth
private static OAuthAttributes ofNaver(String userNameAttributeName, Map<String, Object> attributes) {
Map<String, Object> response = (Map<String, Object>) attributes.get("response");
return OAuthAttributes.builder()
.name((String) response.get("name"))
.email((String) response.get("email"))
.picture((String) response.get("profile_image"))
.attributes(response)
.nameAttributeKey(userNameAttributeName)
.build();
}마지막으로 index.mustache에 네이버로그인 버튼을 추가한다.
<div th:unless="${userName}">
    <!--
        - 네이버 로그인 URL은 appication-oauth.yml에 등록한 redirect-uri 값에 맞춰 자동으로 등록된다.
        - /oauth2/authorization/ 까지는 고정이고 마지막 Path만 각 소셜 로그인 코드를 사용하면 된다.
        - 여기서는 naver가 마지막 Path가 된다.
    -->
    <a th:href="@{/oauth2/authorization/google}" class="btn btn-success active" role="button">Google Login</a>
    <a th:href="@{/oauth2/authorization/naver}" class="btn btn-secondary active" role="button">Naver Login</a>
</div>네이버 로그인까지 성공했다!
▪️기존 테스트에 시큐리티 적용하기
마지막으로 기존 테스트에 시큐리티 적용으로문제가 되는 부분들을 해결해보겠다. 기존의 테스트에서는 바로 API 호출이 가능했지만, Spring Security 적용 후엔 인증된 사용자만이 API 호출할 수 있다. 테스트 코드마다 인증한 사용자가 호출한 것처럼 작동하도록 수정해보자.
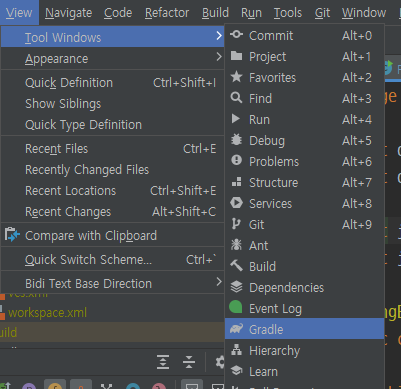
먼저 상단의 View를 눌러준 뒤 Tool Windows로 이동한 후 Gradle을 눌러주면 Gradle Toolbar가 추가된 것이 보인다.
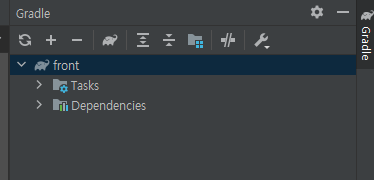
위 gradle > Tasks > verification > test 더블 클릭을 해 전체 테스트를 수행하면, 모두 실패한다.
1. CustomOAuth2UserSerivce 찾을 수 없음 문제
hello가_리턴된다 예외 메세지
No qualifying bean of type 'cohttp://m.webservice.springboot.springboot_board.config.auth.CustomOAuth2UserService'
위 테스트 에러는 CustomOAuth2UserService 생성 시 필요한 소셜 로그인 관련 설정값들이 없기 때문에 발생한다.
application-oauth.properties에 설정값 추가했는데도 왜 설정이 없다고 할까?
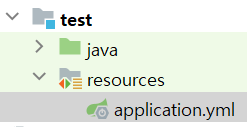
이는 src/main 환경과 src/test 환경의 차이 때문이다. test에 application.properties가 없으면 main의 설정을 그대로 가져오는데, 이때 자동으로 가져오는 옵션의 범위는 application.properties에 국한된다..즉, application-oauth.properties는 test에 파일이 없다고 가져오는 파일은 아니다.
따라서 테스트 환경을 위한 application.properties 생성를 생성한다. 실제로 구글 연동까지 진행은 안하므로 가짜 설정값을 등록한다.
spring:
...
# Test OAuth
  security:
    oauth2:
      client:
        registration:
          google:
            client-id: test
            client-secret: test
            scope:
              - profile
- email2. 302 Status Code 문제 해결
expected:<[200 OK]> but was:<[302 FOUND]>
Expected :200 OK
Actual :302 FOUND
302(리다이렉션 응답) Status Code가 와서 실패한다. 이는 Spring Security 설정 때문에 인증되지 않은 사용자의 요청은 이동시키기 때문이다. 임의로 인증된 사용자를 추가하여 API만 테스트해볼 수 있게 해야한다.
Spring Security Test를 위한 여러 도구를 지원하는 spring-security-test를 build.gradle 의존성에 추가한다.
testImplementation('org.springframework.security:spring-security-test')그리고 Posts_등록된다(),Posts_수정된다() 에 @WithMockUser(roles="USER") 추가한다.
인증된 모의(가짜) 사용자 만들어서 사용하는 것으로,roles에 권한 추가를 할 수 있다.
즉 이 annotation을 통해, ROLE_USER 권한을 가진 사용자가 API를 요청하는 것과 동일한 효과를 지니게 된다.
그리고 @WithMockUser가 MockMvc에서만 작동하기 때문에, @SprinBootTest에서 MockMvc 사용하도록 추가로 아래처럼 PostsApiControllerTest를 수정한다.
    @Autowired
    private WebApplicationContext context;

    private MockMvc mvc;

    @Before
    public void setup(){
        mvc = MockMvcBuilders
                .webAppContextSetup(context)
                .apply(springSecurity())
                .build();
    }
    @Test
    @WithMockUser(roles = "USER")
    public void Posts_등록된다() throws Exception{
    	.
        .
        .
		//when
        mvc.perform(post(url)
                        .contentType(MediaType.APPLICATION_JSON_UTF8)
                        .content(new ObjectMapper().writeValueAsString(requestDto)))
                        .andExpect(status().isOk());

        //then
        List<Posts> all = postsRepository.findAll();
        assertThat(all.get(0).getTitle()).isEqualTo(title);
        assertThat(all.get(0).getContent()).isEqualTo(content);
    }

    @Test
    @WithMockUser(roles = "USER")
    public void Posts_수정된다() throws Exception {
  		.
        .
       	.
        //when
       mvc.perform(put(url)
               .contentType(MediaType.APPLICATION_JSON_UTF8)
               .content(new ObjectMapper().writeValueAsString(requestDto)))
               .andExpect(status().isOk());

        //then
        List<Posts> all = postsRepository.findAll();
        assertThat(all.get(0).getTitle()).isEqualTo(expectedTitle);
        assertThat(all.get(0).getContent()).isEqualTo(expectedContent);
}@Before : 매번 테스트 시작 전에 MockMvc 인스턴스 생성
ObjectMapper : 본문(Body) 영역을 문자열로 표현하기 위해 ObjectMapper를 통해 문자열 JSON으로 변환.
3. @WebMvcTest에서 CustomOAuth2UserService를 찾을 수 없음 문제 해결
1에서 봤던 hello가_리턴된다 예외 메세지가 또 나온다.
No qualifying bean of type 'cohttp://m.webservice.springboot.springboot_board.config.auth.CustomOAuth2UserService'
HelloControllerTest는 1번과 다르게 @WebMvcTest 사용한다.1번을 통해 스프링 시큐리티 설정은 잘 작동했지만, @WebMvcTest는 CustomOAuth2UserService 스캔을 하지 않기 때문이다.
@WebMvcTest는 WebSecurityConfigurerAdapter, WebMvcConfigurer를 비롯한 @Controller,@ControllerAdvice를 읽는다. 즉, @Repository, @Service, @Component는 스캔 대상이 아니다.
SecurityConfig는 읽었지만, SecurityConfig를 생성하기 위해 필요한 CustomOAuth2UserService는 읽을 수가 없어 앞에서와 같이 에러가 발생한 것이다.
그래서 이 문제를 해결하기 위해 스캔 대상에서SecurityConfig 제거한다.
정리=> HelloControllerTest는 @WebMvcTest를 사용하여 특정 컴포넌트만을 스캔한다. 이 설정은 WebSecurityConfigurerAdapter와 @Controller는 포함하지만 CustomOAuth2UserService 같은 필수 컴포넌트는 스캔하지 않아 에러가 발생한다. 이를 해결하기 위해, SecurityConfig를 스캔 대상에서 제외하는 방식으로 문제를 해결한다.
HelloControllerTest에서 아래와 같이 스캔대상에서 SecurityConfig를 제거한다.
@RunWith(SpringRunner.class)
@WebMvcTest(controllers = HelloController.class,
            excludeFilters = {
            @ComponentScan.Filter(type = FilterType.ASSIGNABLE_TYPE, classes = SecurityConfig.class)
            })
public class HelloControllerTest {
그리고 @WithMockUser를 사용해서 가짜로 인증된 사용자를 생성한다.
@Test
@WithMockUser(roles = "USER")
public void hello가_리턴된다() throws Exception{
    .
    .
    .
}

@Test
@WithMockUser(roles = "USER")
public void  helloDto가_리턴된다() throws Exception{
    .
    .
.이렇게 한 뒤 다시 테스트를 돌려보면 아래 추가 에러가 발생한다.
Error creating bean with name 'jpaAuditingHandler': Cannot resolve reference to bean 'jpaMappingContext' while setting constructor argument; nested exception is org.springframework.beans.factory.BeanCreationException: Error creating bean with name 'jpaMappingContext': Invocation of init method failed; nested exception is java.lang.IllegalArgumentException: JPA metamodel must not be empty!
이는 @EnableJpaAuditing 로 인해 발생한다. @EnableJpaAuditing 사용하기 위해선 최소 하나의 @Entity 클래스가 필요한데, @WebMvcTest다 보니 당연히 없다.
@EnableJpaAuditing이 @SpringBootApplication이랑 같이 있어 @WebMvcTest에서도 스캔하게 되었다.
따라서 @EnableJpaAuditing랑 @SpringBootApplication 분리해야 한다.
(1) Application 클래스에서 @EnableJpaAuditing를 제거한다.
(2) config 패키지에 JpaConfig 생성 후 @Configuration,@EnableJpaAuditing 붙인다.
package com.webservice.springboot.springboot_board.config;

import org.springframework.context.annotation.Configuration;
import org.springframework.data.jpa.repository.config.EnableJpaAuditing;

@Configuration
@EnableJpaAuditing
public class JpaConfig {
}이제 모든 테스트를 통과한다.
정리
- 스프링 부트 1.5와 스프링 부트 2.0에서 시큐리티 설정의 차이점
- 스프링 시큐리티를 이용한 구글/네이버 로그인 연동 방법
- 세션 저장소로 톰캣/데이터베이스/메모리 DB가 이으며 이중 데이터베이스를 사용하는 이유
- ArgumentResolver를 이용하면 어노테이션으로 로그인 세션 정보를 가져올 수 있다는 것
- 스프링 시큐리티 적용 시 기존 테스트 코드에서 문제 해결 방법
출처
스프링 부트와 AWS로 혼자 구현하는 웹 서비스